You understand what an API is and why applications need one.
But understanding the concept is only the first step.
The next question is: how do we actually build an API?
For Python developers, FastAPI provides a simple and modern way to turn Python code into a working API.
In this part, we’ll set up FastAPI from scratch, create our first API, run it locally, and see how FastAPI handles requests and generates documentation automatically.
Overview
- What is FastAPI?
- Philosophy of FastAPI: Why FastAPI?
- Why FastAPI is Fast to Run?
- Why FastAPI is Fast to Code?
- FastAPI Architecture
- Setting Up the Environment
- Installing FastAPI
- Creating Your First FastAPI Application
- Running the Application with Uvicorn
- Your First API Endpoint
- Interactive API Documentation
- Understanding the Request–Response Flow
- Key Takeaways
- Conclusion
- What's Next?
What is FastAPI?
FastAPI is a modern Python web framework for building APIs quickly and efficiently.
It is designed to make API development simple while providing features such as automatic data validation, asynchronous request handling, and interactive API documentation.
Instead of manually handling every part of an HTTP request and response, FastAPI provides the structure and tools needed to define API endpoints using normal Python code.
But FastAPI is more than just a way to create endpoints. Its design brings together several components that make building modern APIs easier.
What Makes FastAPI Different?
- Python-based — Built specifically for Python developers.
- Fast — Designed for high-performance API applications.
- Type hints — Uses Python type annotations to define and validate data.
- Automatic validation — Request data can be validated automatically.
- Interactive documentation — Generates API documentation automatically.
- Async support — Supports asynchronous request handling for modern applications.
Philosophy of FastAPI: Why FastAPI?
Choosing a framework for an API is not only about making endpoints work. The framework should also make the application fast, maintainable, and easy to develop.
FastAPI is designed around two primary goals: performance and development speed.
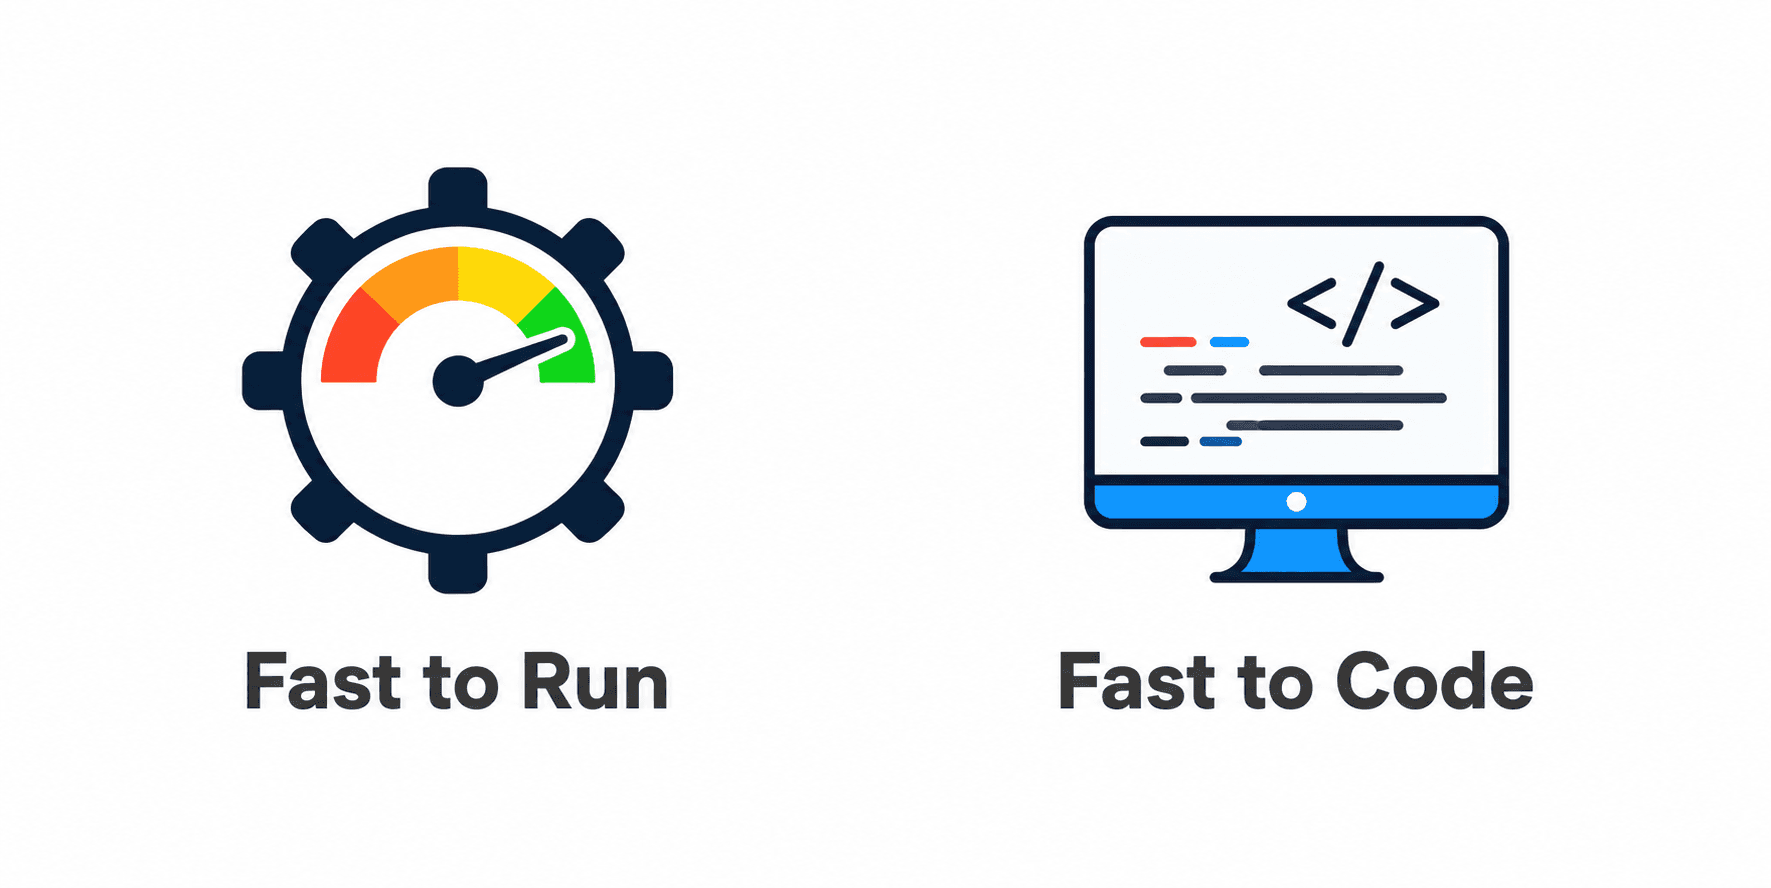
Fast to Run
FastAPI uses ASGI (Asynchronous Server Gateway Interface) instead of the traditional WSGI approach used by older synchronous frameworks.
It works with Uvicorn, an ASGI server, to handle concurrent requests efficiently.
FastAPI also supports Python’s async and await syntax. This is especially useful when an application spends time waiting for I/O operations, such as database queries, external services, or machine learning predictions.
Instead of blocking the application while waiting, asynchronous code can allow other work to be processed.
Fast to Code
FastAPI is also designed to make API development faster for developers.
It uses Python type hints together with Pydantic for automatic data validation and provides built-in interactive API documentation that is generated from your API definitions.
This means you can spend more time writing your application logic instead of manually handling validation and documentation.
FastAPI focuses on two things: fast applications and faster development.
Why FastAPI is Fast to Run?
Web Server → SGI → API Flow
This flowchart explains how a request moves through a Python web application architecture.
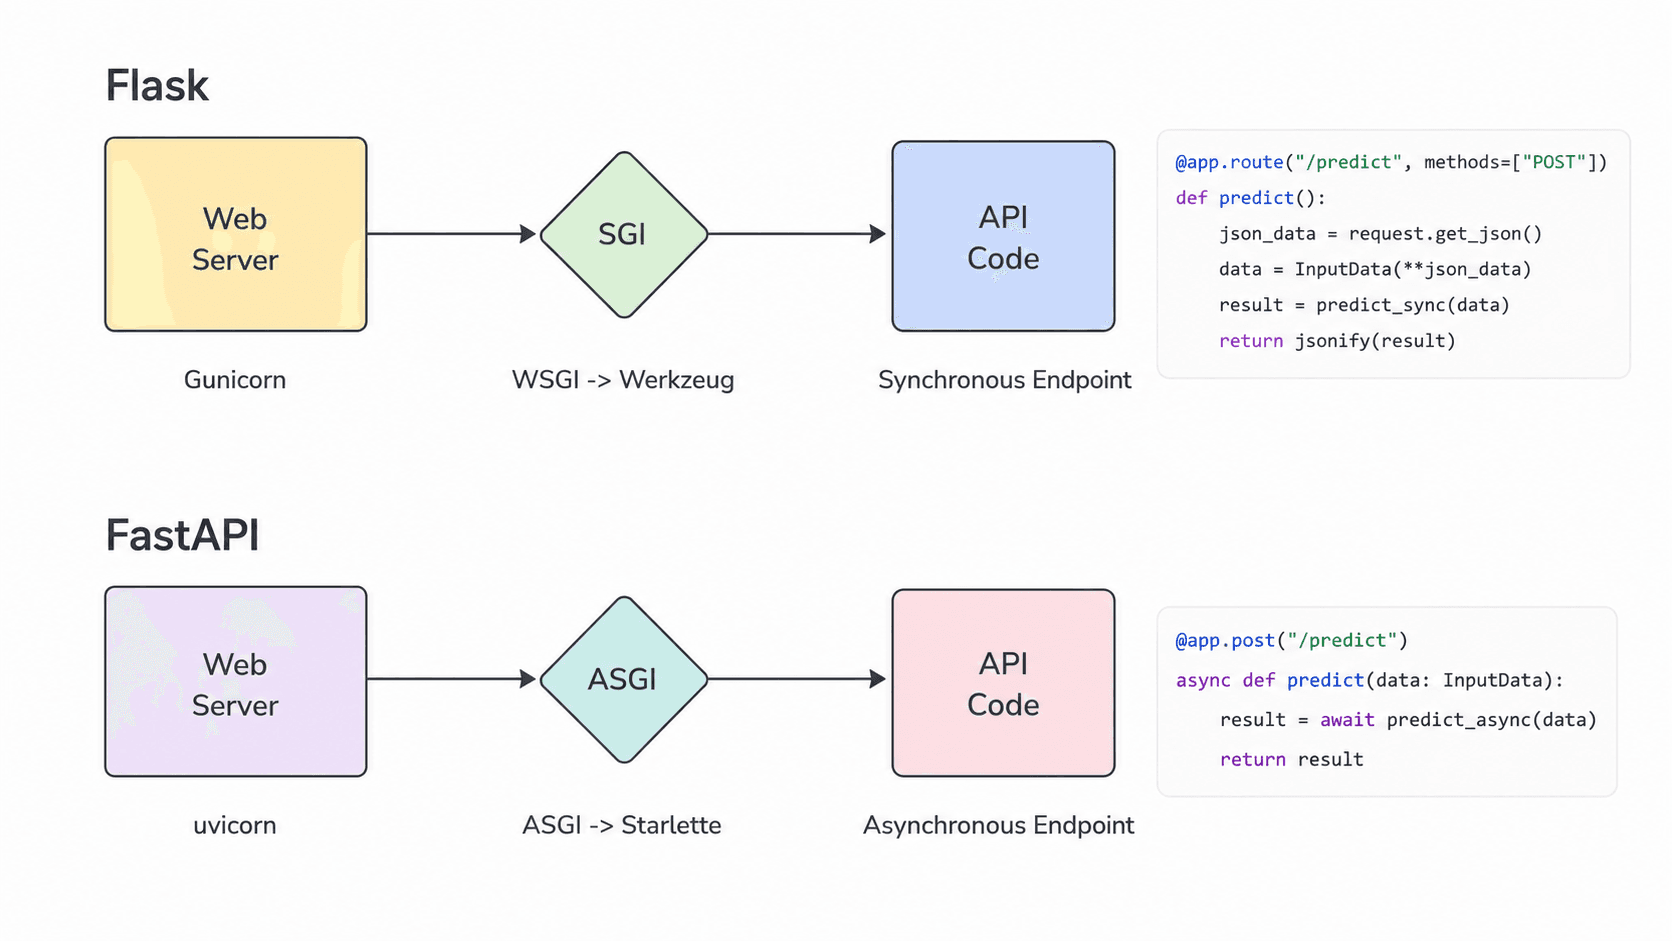
- The client sends an HTTP request to the web server.
- The SGI layer acts as the communication bridge between the server and application code.
- The API processes the request logic.
- A JSON response is returned back to the client.
This architecture helps separate:
- Request handling
- Application logic
- Response generation
It is commonly used in backend systems, ML APIs, and modern web applications.
Flask vs FastAPI Architecture
This comparison highlights the difference between traditional synchronous frameworks like Flask and asynchronous frameworks like FastAPI.
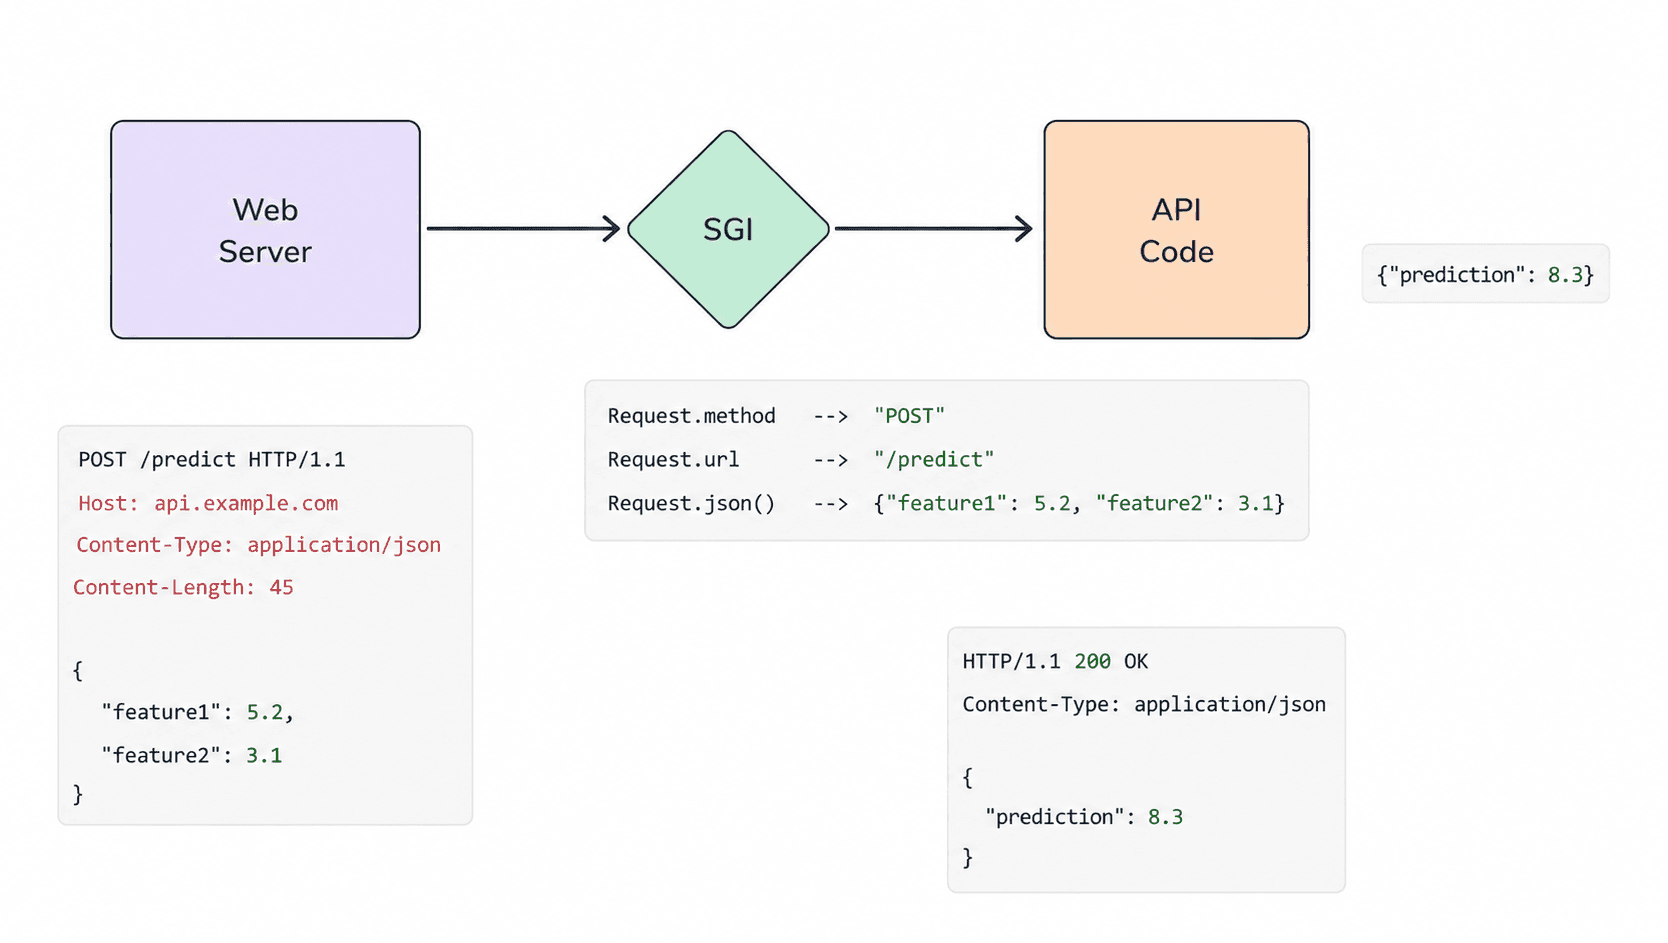
Flask (WSGI)
- Uses synchronous request handling
- Processes one request at a time per worker
- Built on WSGI and Werkzeug
- Commonly served using Gunicorn
FastAPI (ASGI)
- Supports asynchronous programming
- Handles multiple requests efficiently
- Built on ASGI and Starlette
- Commonly served using Uvicorn
FastAPI provides better performance and scalability for modern APIs, especially in real-time systems, AI applications, and high-concurrency backend services.
Why FastAPI is Fast to Code?
Some of the features that make FastAPI fast to code include:
- Automatic input validation
- Type-hinted data handling
- Auto-generated API documentation
- Asynchronous programming support
- Integration with the modern Python ecosystem
- Seamless Integration with Modern Ecosystem (ML/DL Libraries, OAuth, JWT, SQL Alchemy, Docker, Kubernetes etc.)
FastAPI Architecture
FastAPI is built on top of two core libraries: Starlette and Pydantic.
Starlette handles the web-related part of the application, while Pydantic focuses on validating and managing the data flowing through the API.

Starlette
Starlette is a lightweight ASGI framework/toolkit that provides the core building blocks for modern asynchronous web applications and APIs.
FastAPI uses Starlette to handle how requests enter the application and how responses are sent back to the client. It provides features such as:
- ASGI support
- Asynchronous request handling
- Routing and middleware
- A lightweight, high-performance foundation
Pydantic
Pydantic is responsible for data validation and settings management using Python type hints.
FastAPI uses Pydantic for:
- Automatic data validation
- Type-safe request handling
- JSON serialization
- Schema generation
- Data parsing
Setting Up the Environment
Before creating our first FastAPI application, we need a Python environment where we can install FastAPI and run the application locally.
For this tutorial, we’ll use a Python virtual environment. A virtual environment keeps the dependencies for our project isolated from other Python projects on the system.
Create a Project Directory
First, create a directory for the FastAPI project and move into it:
mkdir fastapi-app
cd fastapi-app
Create a Virtual Environment
Create a virtual environment using Python:
python -m venv venvThis creates a venv directory containing an isolated Python environment for the project.
Activate the Virtual Environment
On Windows, activate it with:
venv\Scripts\activateOn macOS/Linux, use:
source venv/bin/activateOnce activated, the environment is ready for installing the dependencies required by our FastAPI application.
A virtual environment keeps project dependencies isolated and makes the application easier to manage.
Installing FastAPI
Before running our FastAPI application, we need to install FastAPI and an ASGI server. The recommended server is Uvicorn.
Open your terminal and run:
pip install fastapi "uvicorn[standard]"This installs:
- FastAPI — the framework used to build the API.
- Uvicorn — the ASGI server used to run the FastAPI application.
[!TIP] Installing
uvicorn[standard]also installs the recommended standard dependencies for running Uvicorn.
Creating Your First FastAPI Application
Now that FastAPI is installed, let’s create our first FastAPI application.
Create a file named main.py and add the following code:
from fastapi import FastAPI

app = FastAPI()

@app.get("/")
def hello():
    return {"message": "Hello World"}

@app.get("/about")
def about():
    return {"message": "About FastAPI"}
This small application already gives us two API endpoints:
/— returns a simple Hello World message./about— returns information about FastAPI.
Understanding the Code
from fastapi import FastAPI: This imports the FastAPI class from thefastapimodule, which provides all the functionality needed to build the API.app = FastAPI(): This creates an instance of the FastAPI class. Thisappinstance is the main point of interaction to create the API. It is also what the ASGI server (like Uvicorn) uses to serve the application.@app.get("/"): This is a path operation decorator.@tells Python this is a decorator.apprefers to the FastAPI instance created earlier.getrefers to the HTTP GET method (used to read data)."/"is the path or route. In this case, it's the root URL.
def hello():: This is the path operation function. It gets called whenever a GET request is made to the"/"URL.return {"message": "Hello World"}: The function returns a Python dictionary. FastAPI automatically converts this dictionary into JSON format and sends it back to the client as an HTTP response.- The
/aboutendpoint follows the same pattern.
Running the Application with Uvicorn
FastAPI applications need an ASGI server to run. For this project, we’ll use Uvicorn.
Make sure your terminal is in the directory containing main.py, then run:
uvicorn main:app --reloadThe command can be understood as follows:
uvicorn— Starts the Uvicorn server.main— Refers to themain.pyPython module.app— Refers to the FastAPI application instance created withapp = FastAPI().--reload— Automatically restarts the server whenever you make code changes. This is recommended during development.
The
main:appnotation tells Uvicorn where to find your FastAPI application.
Your First API Endpoint
Now that our FastAPI application is running, let’s access the endpoints we created in main.py.
We defined two GET endpoints:
@app.get("/")
def hello():
    return {"message": "Hello World"}

@app.get("/about")
def about():
    return {"message": "About FastAPI"}
Root Endpoint
The first endpoint is the root endpoint:
GET /
When you open:
http://127.0.0.1:8000/
FastAPI calls the hello() function and returns:
{
  "message": "Hello World"
}
The @app.get("/") decorator tells FastAPI that the hello() function should be called whenever a GET request is made to the / route.
About Endpoint
The second endpoint is:
GET /about
Open:
http://127.0.0.1:8000/about
The about() function returns:
{
  "message": "About FastAPI"
}
FastAPI automatically converts the Python dictionary returned by the function into JSON and sends it back to the client as an HTTP response.
An API endpoint connects a specific URL and HTTP method to a Python function that handles the request.
This gives us our first working API: two routes, two Python functions, and JSON responses returned to the client.
Interactive API Documentation
One of the most useful features of FastAPI is its automatic API documentation.
Once the FastAPI application is running, FastAPI automatically generates interactive documentation for the API.
Swagger UI
You can open the interactive documentation at:
http://127.0.0.1:8000/docs
This provides a Swagger UI where you can explore the available API endpoints and interact with them directly from the browser.
ReDoc
FastAPI also provides another documentation interface called ReDoc:
http://127.0.0.1:8000/redoc
Both documentation interfaces are generated automatically by FastAPI.
FastAPI gives you interactive API documentation automatically, without requiring you to build a separate documentation page.
This makes it easy to explore your API while developing and understand which endpoints are available.
Understanding the Request–Response Flow
Now that we have created our endpoints and explored the interactive documentation, let’s understand what happens when a client sends a request to our FastAPI application.
The basic flow is:
Client → Web Server → ASGI Layer → FastAPI Application → Response
Web Server → ASGI → API Flow
- Client sends an HTTP request A client, such as a web browser, sends a request to an API endpoint.
- Web Server receives the request The web server receives the incoming HTTP request and passes it to the application through the ASGI layer.
- FastAPI processes the request FastAPI identifies the matching route and executes the corresponding Python function.
- API returns a response The function returns the result, and FastAPI converts the Python dictionary into JSON before sending it back to the client.
For our / endpoint, the flow looks like this:
Client
  ↓
GET /
  ↓
Uvicorn / ASGI
  ↓
FastAPI
  ↓
hello()
  ↓
{"message": "Hello World"}
  ↓
JSON Response
  ↓
Client
This separation allows the web server, ASGI layer, and FastAPI application to handle different parts of the request–response process.
A request enters the application through the server and ASGI layer, FastAPI executes the appropriate path operation, and the resulting data is returned as a response.
Key Takeaways
| Concept | Summary |
|---|---|
| FastAPI | A modern, high-performance Python web framework for building APIs quickly and efficiently. |
| Starlette | Handles the web-related functionality of FastAPI, including request handling and routing. |
| Pydantic | Provides data validation and type-safe request handling using Python type hints. |
| ASGI | Provides the foundation for asynchronous request handling in FastAPI. |
| Uvicorn | An ASGI server used to run FastAPI applications. |
| Path Operation | Connects an HTTP method and URL path to a Python function. |
| API Endpoint | A specific URL where a client can send a request. |
| JSON Response | FastAPI automatically converts returned Python dictionaries into JSON responses. |
| Interactive Docs | FastAPI automatically provides Swagger UI at /docs and ReDoc at /redoc. |
| Flow | A client sends a request, FastAPI processes it through the appropriate path operation, and returns a response. |
Conclusion
FastAPI provides a modern and efficient way to build APIs with Python. Its architecture combines Starlette for web handling and Pydantic for data validation, while its support for ASGI and asynchronous request handling helps provide high performance.
In this part, we set up FastAPI, created our first API application, defined endpoints, ran it with Uvicorn, and explored FastAPI’s automatically generated interactive documentation.
We also saw how a request moves through the server and FastAPI application before a JSON response is returned to the client.
With the fundamentals in place, you are now ready to start building more practical APIs with FastAPI.
What's Next?
Now that we have built our first FastAPI application, created API endpoints, run the application with Uvicorn, and explored its interactive documentation, the next step is to understand how HTTP methods are used in FastAPI.
In the next part, we’ll explore:
- Static vs Dynamic Websites — Understand the difference between static and dynamic applications.
- Client–Server Communication — See how clients and servers communicate using the HTTP protocol.
- HTTP Methods — Learn how GET, POST, PUT, and DELETE define different operations on resources.
- CRUD Operations — Understand how Create, Read, Update, and Delete operations map to HTTP methods.
- JSON Data Flow — See how JSON is used to transfer structured data between applications and user interfaces.
- FastAPI in Practice — Connect these concepts to a patient management system and understand how APIs work with real application data.
Series: FastAPI for Machine Learning — Part 2 of 12